
Banner X ads are responsive, interactive banner ads with multiple components delivered to a retailer's frontend. This topic provides step-by-step instructions on how to create different formats of banner X campaigns.
Prerequisites
- Work with your Integration Program Manager (IPM) team to create a retailer and/or supplier team for your namespace.
- Ensure your catalog is synced with at least one product before you start creating campaigns. For more information on catalog syncing, see Create a product catalog.
- Verify that the content standard is defined by your retailer and shared with the IPM team.
- If you wish to preview banner X before launching, ensure a previewer is integrated. For more information, see Integrate your banner X previewer.
Step 1: Select your team
To create a campaign, first select the team you wish to use.
-
Log in to the platform where your teams are set up, either a sandbox account or the Epsilon Retail Media platform (for example, visit https://sandbox.citrusad.com).
-
Select the retailer or supplier team. Each team includes unique members, products, and catalogs.
-
Click New Campaign.
-
Search and select the campaign’s owner team.
-
After you select your team, click Next to proceed.

Step 2: Configure campaign settings
Follow these steps to configure your campaign settings:
-
In Settings, select Banner X under select campaign type.
-
Choose the placement for your campaign. The campaign placement determines how the ad is triggered and where it appears on the retailer's website. For more information, see Placement types. The success of a campaign often depends on ad placement, so select placements that align with your campaign objectives and target demographic. Popular placement types for banner X include:
- Category
- Home
- Broad display
- Search
- Checkout
-
Enter your campaign name. The name appears in the Campaign Manager and Reports pages. It's recommended to name campaigns after promoted products, specific time frames, or strategies (e.g., Cadbury Chocolate June Clearance) for easy identification on the Reports page.
-
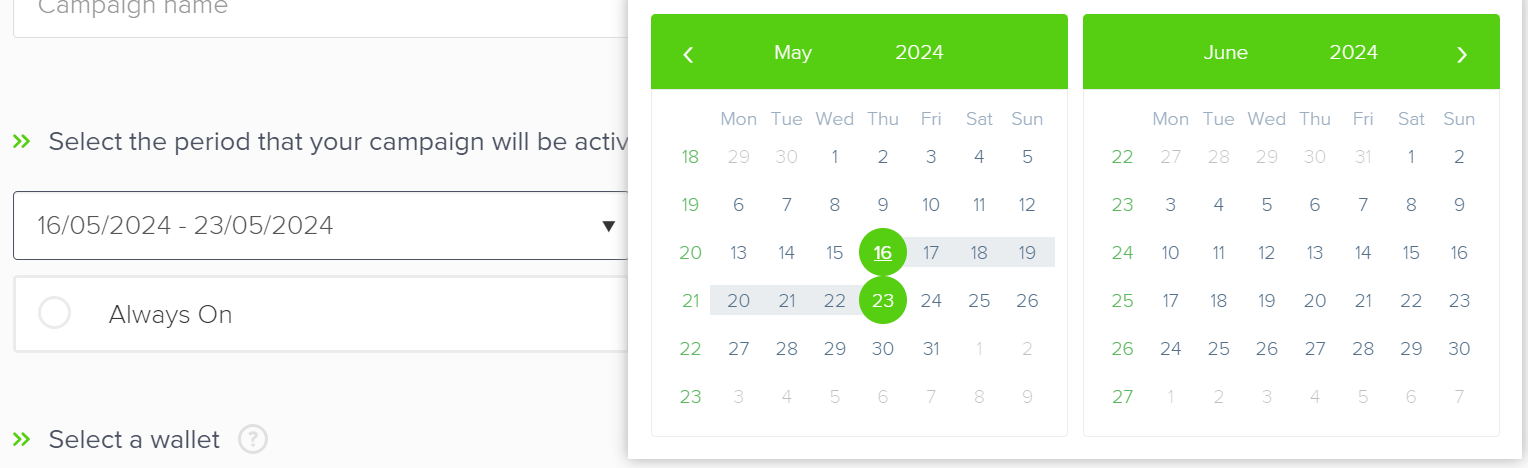
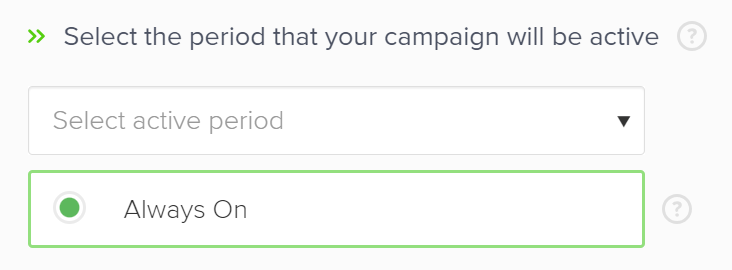
Specify the time duration for which you want your ad to be active. Choose whether your ad runs for a set time period or continuously.
Note for retailersDo not select the Always On option. As a retailer, you can only choose Fixed Tenancy as the spend type. Fixed Tenancy Ad (FTA) campaigns can only be booked for specific dates and do not run indefinitely. For more information, see Step 7: Define ad strategy.
-
If you set dates, the ad starts one minute after midnight on the start date and ends at midnight on the end date.
-
If you select Always On, your ad starts immediately on the same date and continues running based on the strategy you establish later in the setup process.
-
-
Select a wallet to pay for your ad. If you have just one wallet, it's automatically selected.
- If only one wallet is available, the platform automatically selects it.
- If multiple wallets are available, choose a wallet from the dropdown list.
- To add a new wallet at this point, contact your IPM.
Ensure your wallet has sufficient funds. If the wallet reaches the specified budget, the ad will stop running.
-
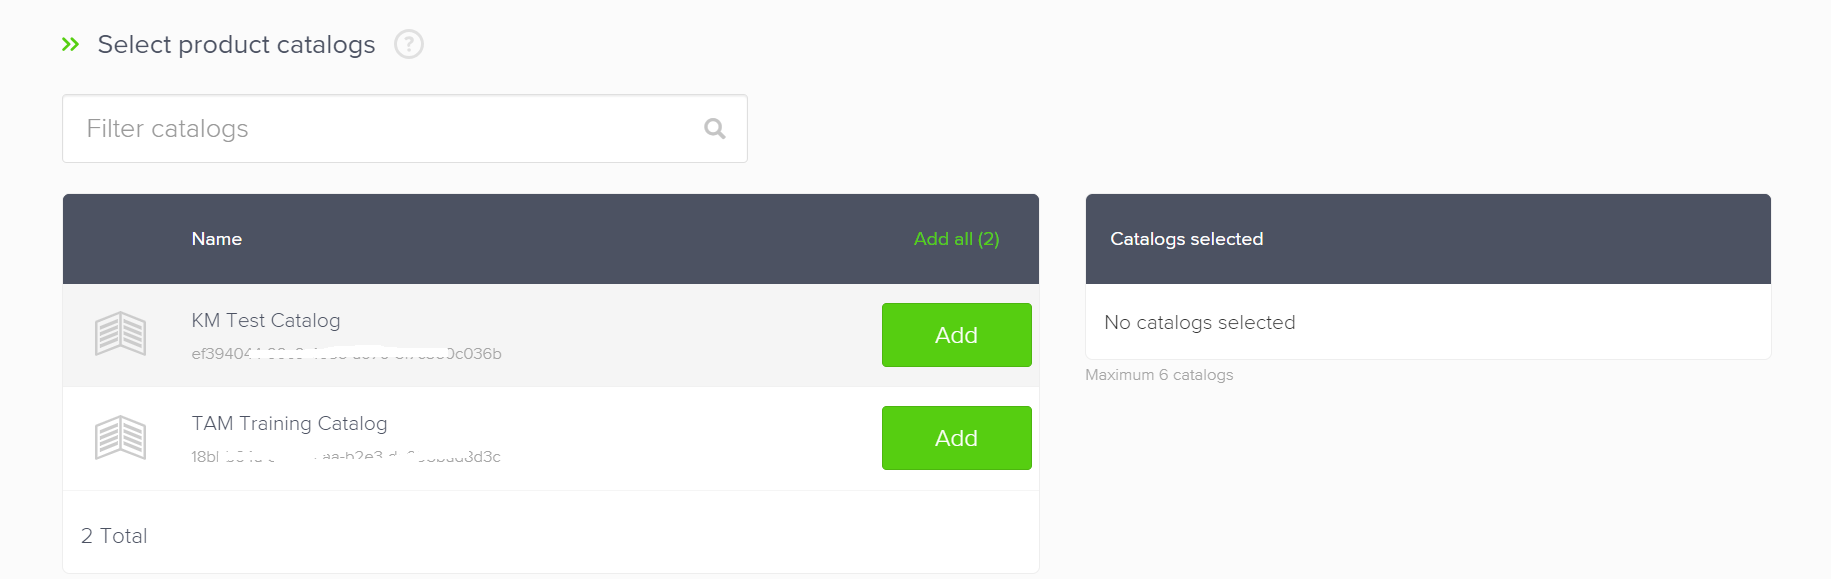
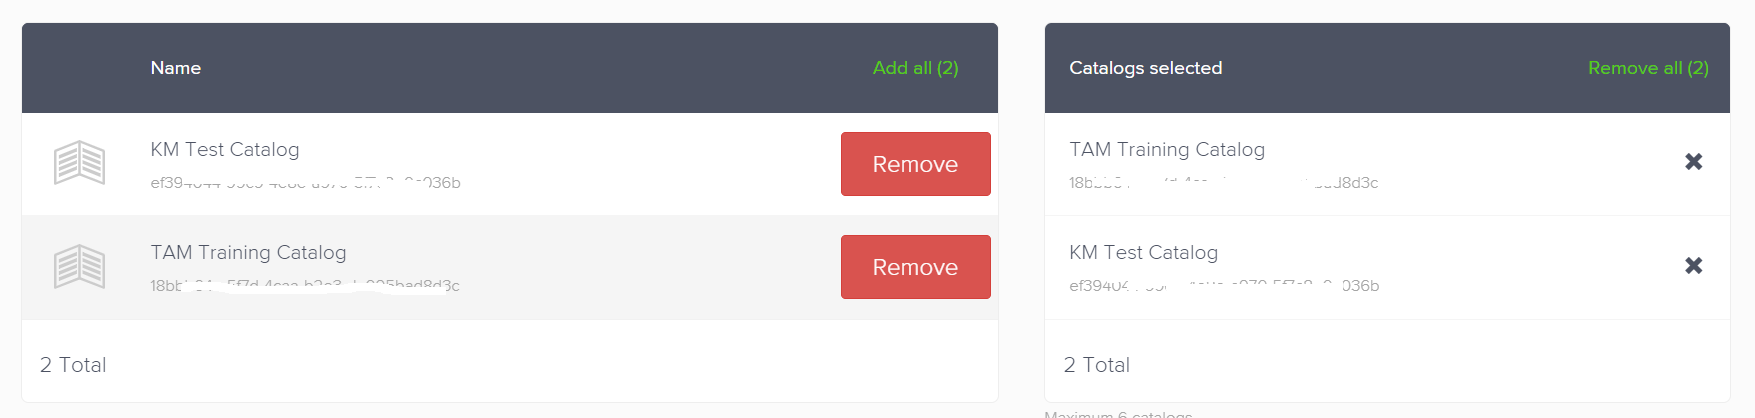
Add product catalogs. All the available catalogs are listed.
-
If your retailer provides multiple catalogs, select each one individually and click Add. You can add up to six catalogs.
-
If only one catalog is available, select it and click Add.
-
You can also search for a specific catalog by name.
-
Once you've added the catalogs, your added catalogs will appear under the Catalogs selected table.
-
-
Click Next to continue.
Step 3: Add products to your campaign
-
Add product(s) to your campaign. You can simply search the products by name, barcode number, or associated keywords such as your brand name. Select either a single product or multiple products for your campaign. If several products align with the same search terms or share similar attributes, consider grouping them into one campaign.
Note- You need to enter minimum of two characters for the search result to start appearing.
- In Epsilon Retail Media platform, some restrictions may prevent specific products from appearing in search results. For details, see Product Selection Restrictions.
- Product ads will not be served for products that are out of stock.
- If more than one catalog was selected in the previous step, each must contain products. A minimum of one product per catalog is required.
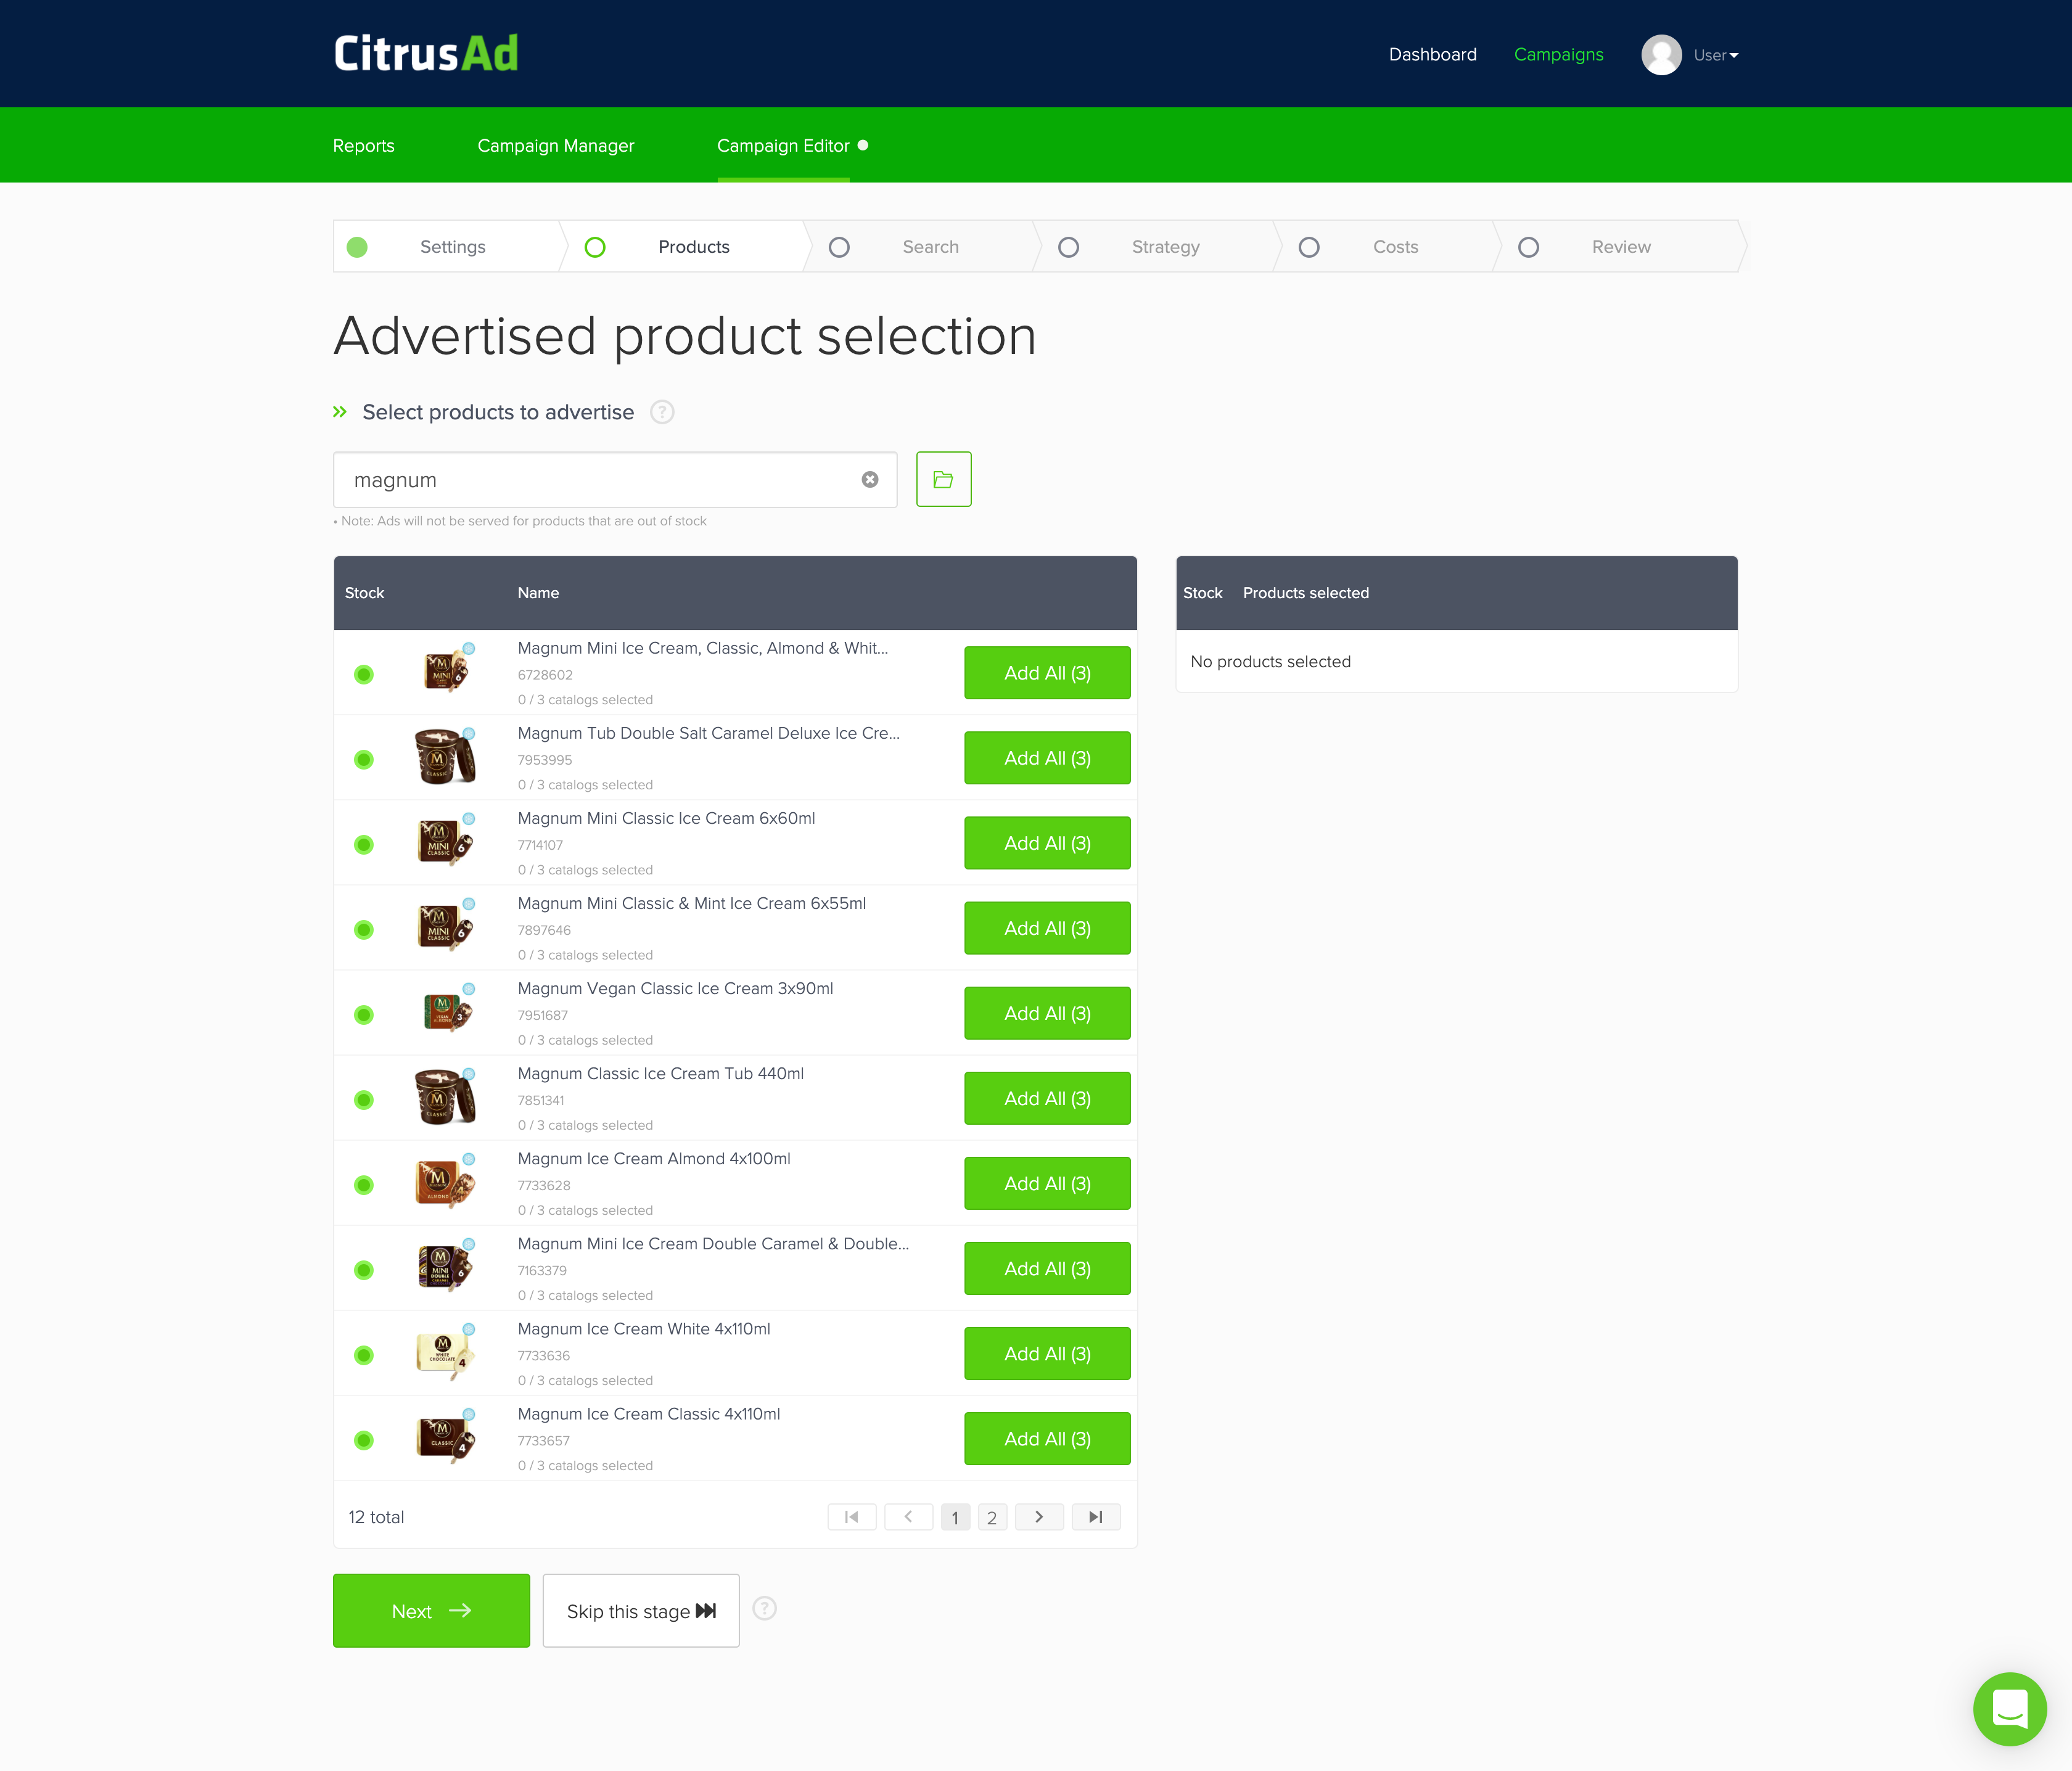
-
Click Add. This will include all instances of matching product codes across your selected catalogs.
-
You also have the option to upload a CSV file containing the product details. To do this, click the upload button.
Your CSV file can include product codes, or pairs of product codes and catalog IDs.

- If you opt to upload by product codes, the system selects these product codes across all selected catalog IDs.
- Uploading pairs of product codes and catalog IDs allow you to select products on a catalog-by-catalog basis.
- If you're unsure about the format for your CSV file, click on Download template. This provides a sample template for your reference.
- Once your file is uploaded, you will see the total number of products currently in stock.
-
Click Import to add your products.
-
Click Next to proceed.
-
If you're not prepared to select products, click the Skip this stage button. This action saves your campaign as a draft until you add products for the advertisement. You can revisit and update this step before launching your campaign.
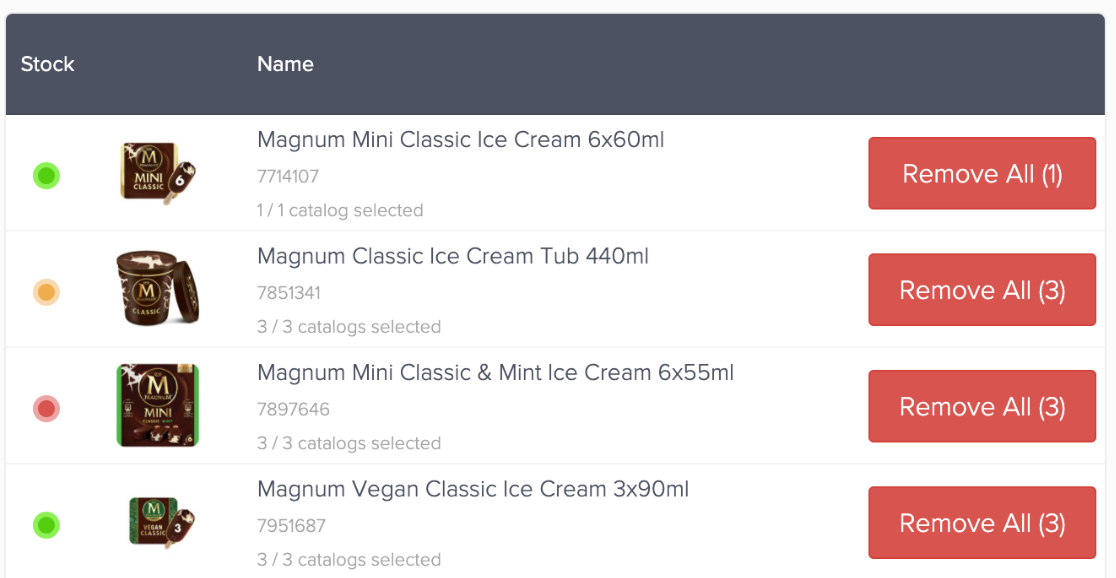
Product stock indicator
The color-coded indicator shows the stock status of your product. You can hover over each indicator to see a tooltip explanation.
Here's what each color represents:
- Green: The product is available in all selected catalogs.
- Amber: The product is available in some, but not all, selected catalogs.
- Red: The product is out of stock in all selected catalogs.
Step 4: Configure target criteria
Targeting criteria refers to the specific characteristics or parameters used by businesses to identify and reach potential customers who are most likely to be interested in their products or services. These characteristics can include age, gender, location, income level, past purchasing behavior, interests, and more. For example:
- A bookstore might use targeting criteria to identify customers who have previously purchased mystery novels, and then send these customers information about new releases in the mystery genre. This approach allows businesses to focus their marketing efforts more effectively, potentially saving resources and increasing sales.
- A sports goods retailer might use targeting criteria to identify customers who have previously purchased hiking equipment, are aged between 20 and 35, and live in areas known for outdoor activities. They can then tailor their advertising to show these customers ads for new hiking boots or camping gear, thus increasing the likelihood of making a sale.
This step will vary depending on the placement type you've selected. Refer to the steps that are applicable for your placement type.
If you've selected a broad display as the placement type then you will not see any targeting criteria.
- Category
- Search
- Category cross-sell
- Search cross-sell
(Optional) Step 4a: Configure targeting for categories
NoteThis step is applicable only for Category Placement Types on retailers that have enabled this capability. For retailers that have not enabled this capability, your products will automatically show on all relevant categories.
During this step, you choose the categories for your ad, which decide where your ads will appear on the retailer's website.
Epsilon's Retail Media system suggests categories for your products automatically. You can either accept these suggestions or remove categories according to your preferences. To do so,
-
In Targeting, filter the categories.
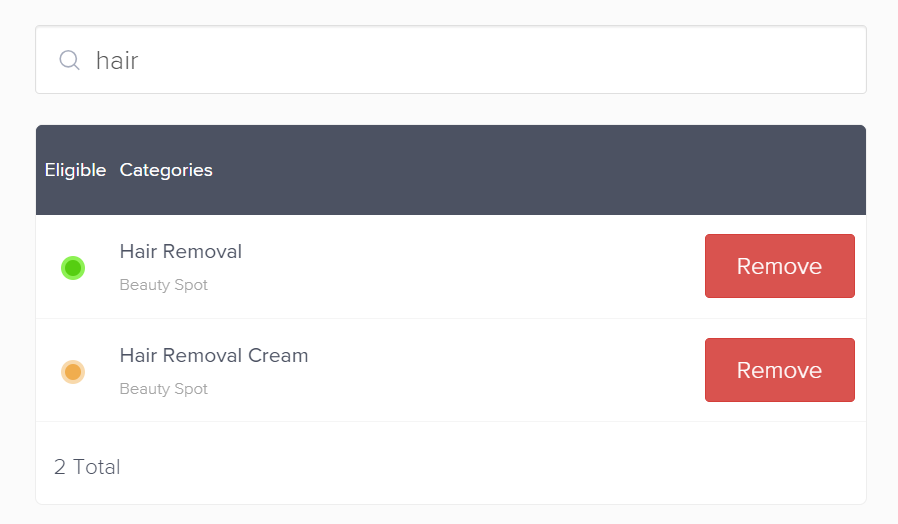
-
Click Remove.
-
Once you've made all the selection, click Next.
(Optional) Step 4b: Configure search terms
This step is applicable only for Category & Search or Search Placement Types.
At this stage, you can include and exclude search terms for your campaign. You can specify exact match or phrase match for your terms. If you've selected a single catalog, it will also show search volume and winning bid for the previous 30 days for each search term that is entered. For more information, see Search Term Metrics.
- Exact match: This refers to the search terms that exactly match your keywords. If your keyword is "blue running shoes", your ad will only appear for users who type in "blue running shoes" in the exact order without any other words.
- Phrase match: Phrase match keywords are a string of words. Your ad can appear when users search for your exact keyword phrase, and potentially for searches that include additional words before or after the phrase. For example, if your keyword phrase is "running shoes", your ad might show for searches like "women's running shoes", "running shoes for men", or "buy running shoes online". For more information, see Phrase match search terms.
Phrase match can only be utilized if it has been enabled by your retailer.
Search terms
- Enter search terms relevant to your product's and/or your campaign goals and click Add. The more search terms you add, the more likely your campaign will get impressions.
You can add multiple keywords separated by a comma, up to a maximum of 500 search terms.
- You also have the option to upload a CSV file containing the search terms.
- To do this, click the Upload a CSV file button.
- If you're unsure about the format for your CSV file, click on Download template. This will provide a sample template for your reference.
- Select phrase or exact match type for the upload.
- Click Import to add your search terms.
- After adding all search terms, you have the option to add negative search terms or click Next.
Negative search terms
This feature can only be utilized if it has been enabled by your retailer.
Negative search terms exclude specific words or phrases from your campaign, preventing your ads from appearing in unrelated searches. This strategy refines your audience, lowers costs, and boosts campaign efficiency. For example, adding "used" as a negative term for a new car ad avoids displaying it to those seeking used cars.
- Click the down arrow in Negative Search Terms.
- Enter negative search terms that you wish to target and click Add. Negative search terms enable you to exclude specific searches where you don't want your campaign to be shown.
- You also have the option to upload a CSV file containing the search terms.
- To do this, click the Upload a CSV file button.
- If you're unsure about the format for your CSV file, click on Download template. This will provide a sample template for your reference.
- Select phrase or exact match type for the upload.
- Click Import to add your search terms.
- Click Next.
Suggested search terms
When you're setting up search terms, our platform gives you suggestions based on the products you've picked. These are the best keywords for your products. For more information, see Suggested Search Terms.
Get in touch with your IPM to configure this feature.
Summary
This section provides the summary of all the terms you've added. Review the summary, then click Next.
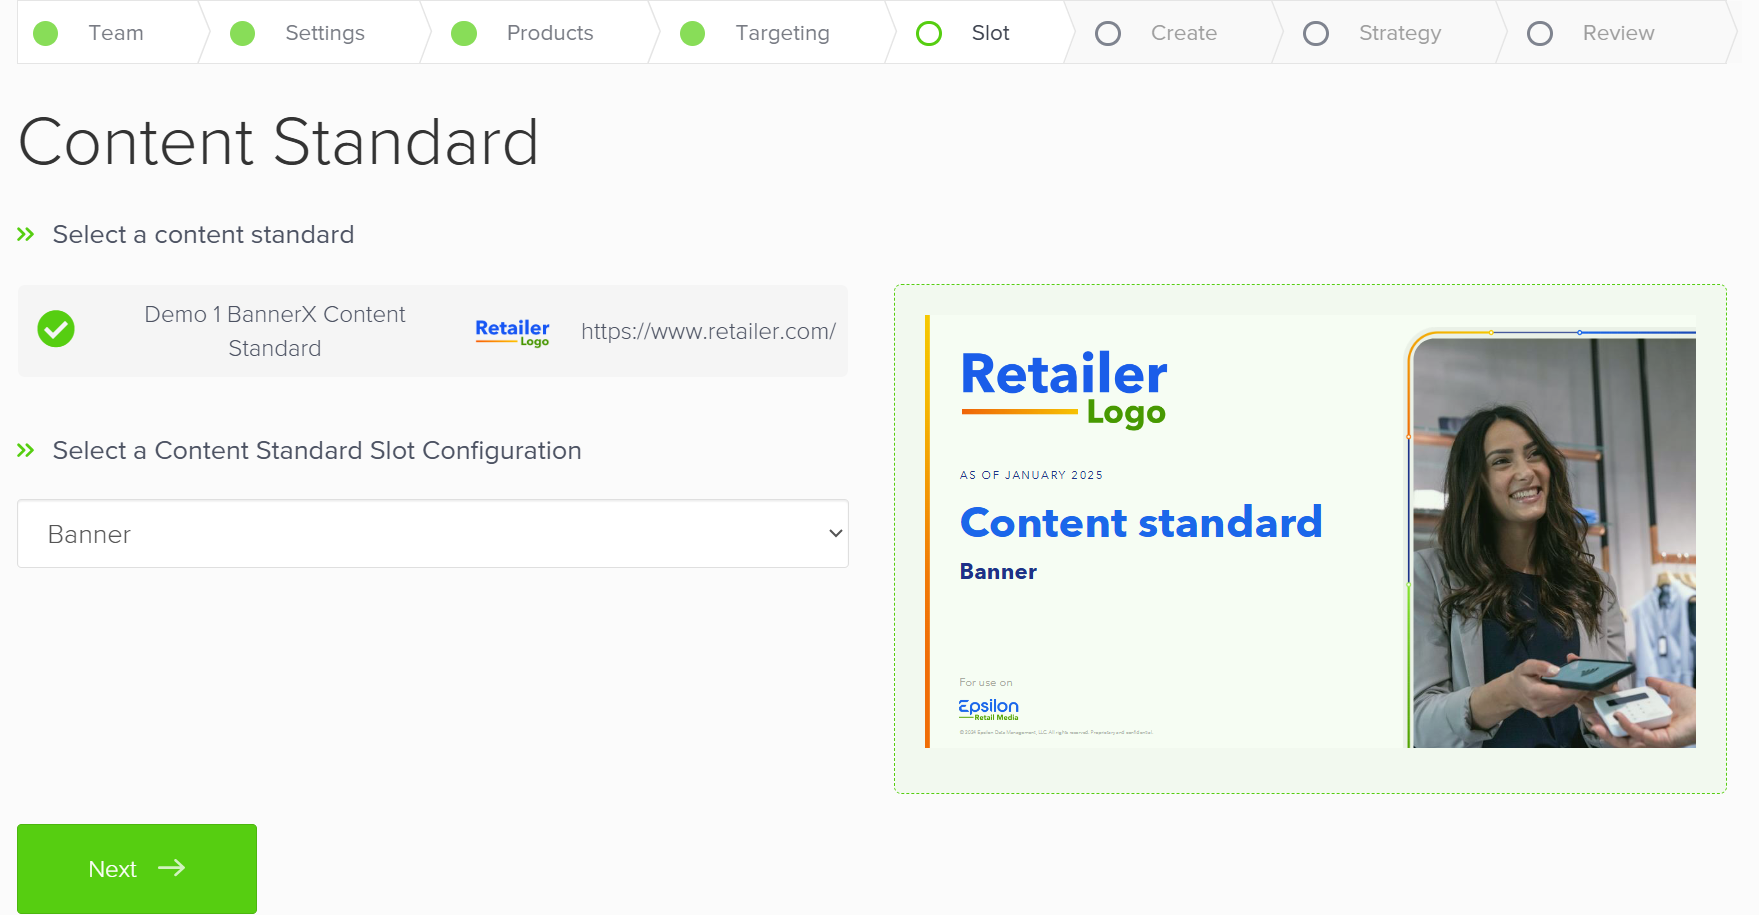
Step 5: Select content standard and slot configuration
-
Select the content standard defined by your retailer. For more information on content standard, see Banner X content standard.
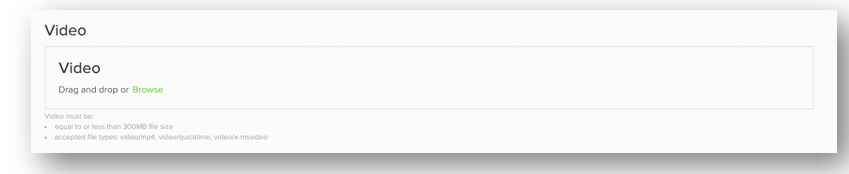
Video banner X specificationsWhen using video banner X, adhere to the following specifications:
- Maximum file size: 300MB
- Accepted file types: Video/mp4, video/quicktime, video/x-msvideo
- Heights and widths: Defined by the retailer in pixels
- Duration limit: None
-
Select a Content Standard Slot Configuration. For more information on slot formats, see ad slot formats.
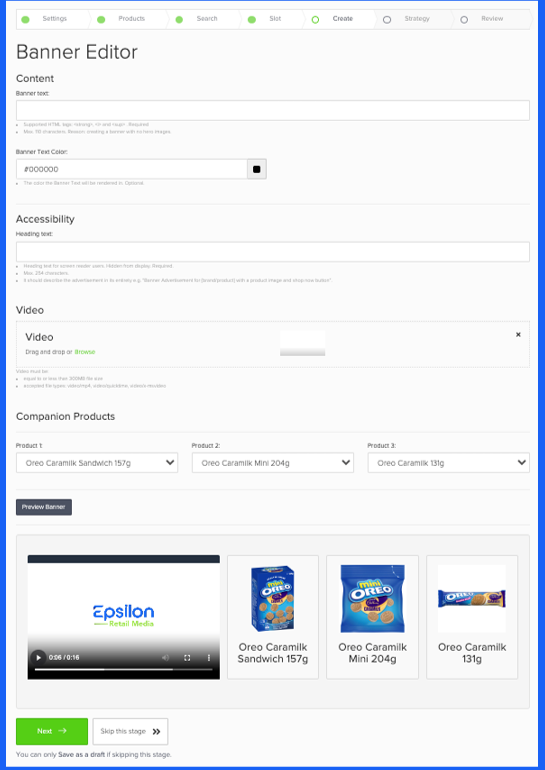
Step 6: Create your banner
Based on the Standard Content document, configure the following on the Banner Editor page:
Content
- Banner Text
- Banner Text Color
- Background color
Call To Action (CTA)
- Enable Call to Action
- Call To Action Text
- Call To Action Text link
- Call To Action Accessibility Text
Accessibility
- Heading Text
Background Image
- Primary Background Image Position
- Primary Background Image
- Secondary Background Image Position
- Secondary Background Image
Hero Image
- Hero Mode: Portrait, Landscape
- Hero Image
- Hero Image Alt Text
- Secondary Hero Mode
- Secondary Hero Image
- Secondary Hero Image Alt Text
- Tracking Tags (Optional)
Video
To add the video:
-
Drag and drop or browse to upload the video. For more information on the specifications, see video specifications.
Companion Products
Companion products component allows brands to select an ordered list of shoppable products along with the banner. For specifications, see companion products specifications.
To add the Companion Products,
-
Select the products from the dropdown menu. This is a subset of the products selected on the Advertised product selection page.

Preview Banner
After defining all the elements discussed in the preceding sections:
-
Click Preview banner to view the video and product appearance before finalizing, to ensure both quality and accuracy.
-
Click Next.
Step 7: Define ad strategy
For Supplier teams creating campaigns themselves, it is recommended to utilize auction flow for creating campaigns.
For the retailers only Fixed tenancy is offered as the spend type. Fixed tenancy is a spend type in which retailers provide advertisers the opportunity to reserve specific ad placements for a predetermined duration and cost. For instance, a clothing brand may choose to secure the top search result spot for the keyword winter coats on an online retail platform for a whole month. Regardless of how many users search for winter coats during this period, the brand's ad would consistently appear at the top, providing them with maximum visibility for a fixed cost.
- You can only book Fixed tenancy ad (FTA) campaigns for specific dates, which means they don't run indefinitely.
- When setting up a Fixed tenancy campaign, the platform conducts a check to ensure that no other campaigns share the same parameters. These parameters include:
- Ad placement
- Active period
- Category or search term
- Position (Search placement)
- Both Auction and FTA campaigns will run concurrently. However, FTA campaigns always take precedence over Auction campaigns. For instance, if a Search Page (SP) has five positions and an FTA campaign is booked for the first position, the Auction campaigns will occupy the second to fifth positions.
To define spend strategy, perform the following steps:
- Verify or change the wallet. In the Strategy stage, the system automatically selects the wallet you added during the Settings step. To use a different wallet, click change in the Selected wallet section.
- Set a spend type. This ensures that your campaign spend does not exceed the specified amount. In the Select spend type section, Fixed tenancy is the default selection for the campaigns created by retailers.
- Choose the campaign position. Select the fixed position for your campaign to appear. Upon selecting a position, the system verifies the availability of the placement. If a "Placements" cloud appears, you must either remove any displayed placements or choose a different position. These are placements that have already been booked for the active period of the selected campaign.
- Select a campaign cost. Ensure no conflicting placements exist before selecting the campaign cost. This cost is the agreed price between the supplier and the retailer. Upon launching a campaign, the system charges the user's wallet with this amount.
- Allocate costs to catalogs (Optional). If you selected two catalogs in the Settings, allocate a percentage of the total campaign cost to each catalog. This specified share will be used for reporting calculations.
- Click Next to proceed.
Step 8: Review your campaign settings
Now that you've defined all the settings and strategy for your campaign, it's time to review your campaign and submit it for approval.
-
If you wish to make any changes to the campaign, click Edit campaign and make the required changes.
-
Once you're confident in your changes, click Submit for approval. This action will place your campaign in a queue for approval. Once approved, your ads will begin to display and your wallet will be charged accordingly.
-
If you're still unsure about your campaign settings and strategy, you can click Save as Draft and return to submit it for approval at a later time.
