Step 1: Create a Product Catalog
The first step involves creating a product catalog. The catalog contains your product details, which are required to serve ads for your products.
- You can create a single catalog or multiple catalogs in one request. If you are creating multiple catalogs, you can sequence up to 100 catalogs per request.
- Upon creating a catalog, a
catalogIdis returned. ThiscatalogIdis required when adding your product details to your catalog, serving as the unique identifier for the catalog. - If you are unable to create a catalog using the APIs mentioned in this document, contact your Customer Integration Engineer (CIE). They can create the catalog on your behalf.
- Once a catalog is created, it is hidden by default, so you need to contact your CIE to make it visible for your namespace.
Prerequisites
You must have API keys and the base URL before requesting to create catalogs.
-
You must have a valid API key. To fetch the API keys, do the following:
-
Log into your Epsilon's Retail Media team account.
-
Navigate to the top right of the page and click on the drop-down menu.
-
Select Integration Settings, from the drop-down menu.

-
Click on the API Key tab. Your secret API key is initially hidden. To view it, click on the Show button. Once it becomes visible, copy your secret API key. Use this key for making API calls.
-
-
You must have the Base URL for the API endpoint. For example, https://staging-test.citrusad.com/v1/ads/generate HTTP/1.1. Check with your Technical Account Manager for the Base URL.
Create a Single Catalog
This API endpoint allows you to create a new catalog. Each catalog is uniquely identified by an id that you will need for further operations, such as when adding product details to the catalog.
Request Parameters
| Object | Type | Description |
|---|---|---|
| catalogs | array, required | An array of catalog objects to be created. |
| name | string, required | The name of the catalog. It is recommended to use a meaningful name that can be easily identified and associated with the retailers. |
Request Example
POST $BASE_URL/v1/catalogs HTTP/1.1
accept: application/json
content-type: application/json
Authorization: Basic <API_KEY>
{
    "catalogs": [
        {
            "name": "Retailer A"
        }
    ]
}
Response Example
The responses follow a standard JSON format and returns the following details in an array.
teamId: The ID of the team associated with the catalog.name: The name of the catalog.id: The unique identifier for the catalog. This ID is required for further operations such as when adding your product details to your catalog.
{
    "catalogs": [
        {
            "teamId": "9f48572c-0a5b-4997-9a0e-ed74f4d32dc6",
            "name": "Retailer A",
            "id": "216af452-d219-4807-b8ca-578bba446541"
        }
    ]
}
Once an object is successfully returned, you receive an ID for your new catalog. If you submit the same request again, you will receive a new ID, resulting in the creation of two catalogs.
Create Multiple Catalogs
This API endpoint allows you to create multiple catalogs. When creating multiple catalogs, you can sequence up to 100 catalogs per request. Below is an example context for creating two catalogs:
Request Example
POST $BASE_URL/v1/catalogs HTTP/1.1
accept: application/json
content-type: application/json
Authorization: Basic <API_KEY>
{
    "catalogs": [
        {
            "name": "Retailer A"
        },
        {
            "name": "Retailer B"
        }
    ]
}
Response Example
The responses follow a standard JSON format and returns the following details in an array. Each catalog will have its own individual teamid, name, and id:
teamId: The ID of the team associated with the catalog.name: The name of the catalog.id: The unique identifier for the catalog. This ID is required for further operations such as when adding your product details to your catalog.
{
    "catalogs": [
        {
            "teamId": "9f48572c-0a5b-4997-9a0e-ed74f4d32dc6",
            "name": "Retailer A",
            "id": "216af452-d219-4807-b8ca-578bba446541"
        },
        {
            "teamId": "9f48572c-0a5b-4997-9a0e-ed74f4d32dc6",
            "name": "Retailer B",
            "id": "75047339-65f5-41b8-8f2c-e76b04716cd4"
        }
    ]
}
Create Multiple Catalogs Per Retailer
To manage multiple catalogs:
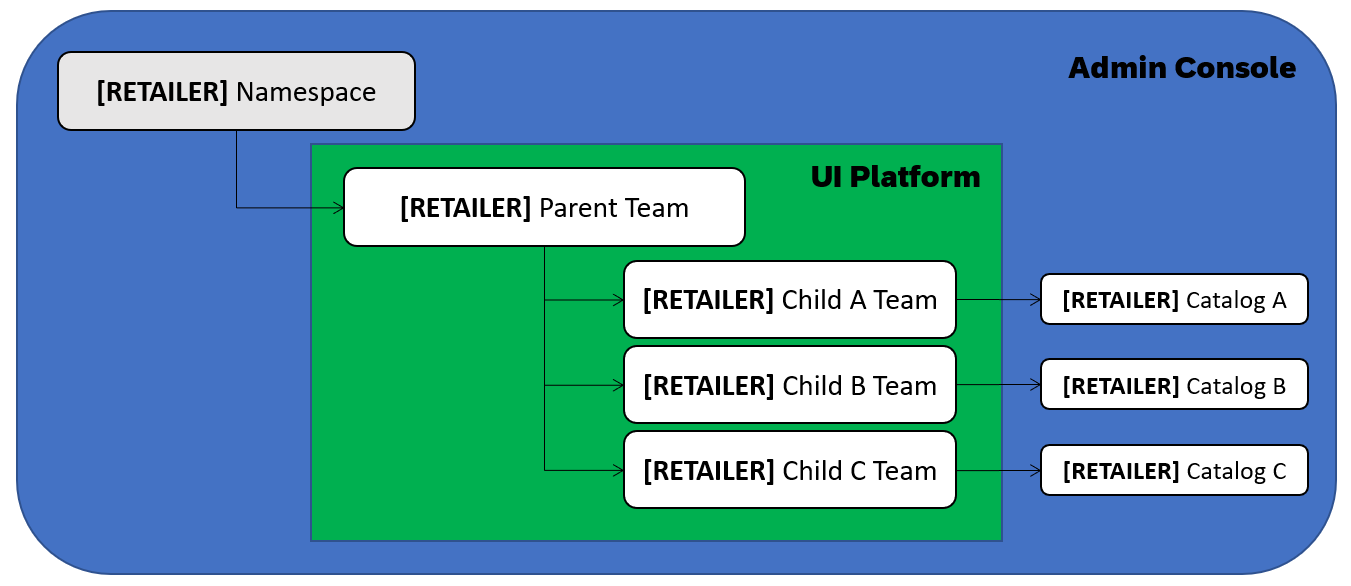
- Create separate 'child' retailer teams for each catalog and a single 'parent' retailer team.
- Set up the parent/child relationship between the parent team and each child team, ensuring the parent team is correctly associated with all child teams.
- After setting up the parent team, update the content standards for all child teams to link them with the parent team. Contact your Customer Integration Engineer (CIE) to do this.
When creating multiple catalogs for a retailer, consider the following points:
-
1-to-1 Relationship: The safest setup is to have a 1-to-1 relationship between catalogs and retailer teams. Although not strictly necessary, it helps avoid complications.
-
Example Structure: In the following diagram, the parent team is nested within the retailer's namespace. Each child team (A, B, C) has its own associated catalog (A, B, C). This structure ensures that purchases are correctly attributed to the respective catalogs based on the team’s API key used in the order confirmation.

-
Multiple Catalogs Under One Team: You can create multiple catalogs under the same retailer team. However, ensure that SKUs and SessionIDs are not shared across these catalogs to maintain correct attribution. Including the
catalogIdin the order API call helps in distinguishing the catalogs and prevents attribution errors. For more information, see Syncing order data via API. -
Attribution Issues: Sharing SKUs and
session IDsacross catalogs can cause attribution problems. For example, if you have a website in two languages (e.g., ES and FR) with one retailer team associated with two catalogs (one for each language) and shared SKUs, a user identified by the samesessionIDin both versions could result in a purchase on the ES site being attributed to the FR site, and vice versa. Including thecatalogIdin the order API call remedies this issue by ensuring that the attribution is correctly assigned to the respective catalog. For more information, see Syncing order data via API.
Updated over 1 year ago
